By Steve Bain
If you’ve ever had the opportunity to browse through the product packaging in an automotive store, you’ve seen first hand the primary uses of metallic-style lettering. Before graduated PostScript fills became the norm in digital illustration, metallic illustration effects like the one shown below could only be achieved through tedious, manual airbrushing.
Fortunately, CorelDRAW includes simple tools to emulate virtually any illustration effect. Following the steps in this exercise will demonstrate one of the quickest and simplest ways of producing striking-looking chrome lettering. Although I’ve chosen to use CorelDRAW X4 for this tutorial, the step sequence I describe can be used with virtually any version of CorelDRAW as far back as version 5. I’ve also specified colors using the CMYK (cyan, magenta, yellow, black) color model.
Step 1: Create an Object for Your Effect
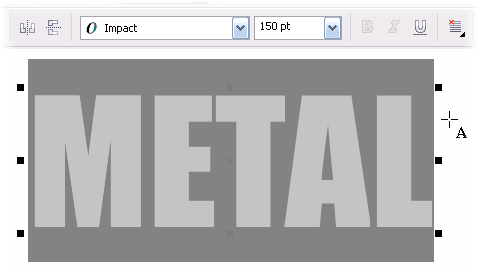
You can make virtually any object appear as if it is made from metal using this technique. To make it interesting, I’ve chosen to use an Artistic Text object. As you follow along, you can imagine other object types to use. But until then, use the Text Tool to enter a string of characters-ideally in all uppercase characters. For my example, I’ve used the word ‘METAL’. Fill your text with White and apply an outline color of Black. Apply a bold font style using Property Bar options. In my case I’ve chosen the font called Impact. Set your font size to roughly 150 points (see below).
Step 2: Draw a Curve Object
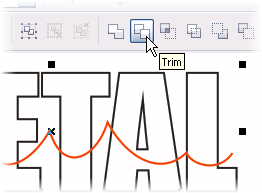
Once your text properties have been set, Copy (Ctrl+C) your text to the clipboard for a later step. Choose the Freehand Tool and draw a rough, slightly-curved line by click-dragging the cursor from left to right across your page. Try to keep the orientation of your curve roughly horizontal while curving the line downwards slightly near the center of the vertical strokes of each letter as I’ve done in the illustration below. With your curve created, center it roughly vertically with your text object near the lower portion of the character shapes. Be sure the length of your curve extends beyond the first and last characters of your text object. Choose the Pick Tool and resize it using the resizing handles if needed.
Step 3: Trim the Text and Apply a Custom Fountain Fill
Select both the curve and the text using the Pick Tool. Click the Trim button in Property Bar (see below) to trim your text using the curve. This divides the object into a complex compound path.
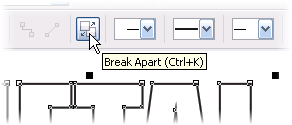
With your trimmed text still selected, click the Break Apart (Ctrl+K) Property Bar button to break the shapes apart (see below).
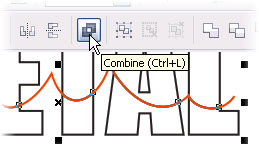
Using the Pick tool, click a blank space of your page to deselect all objects, select the upper portions of the characters and delete them along with the curve you used to trim the text. Select all of the remaining shapes and use the Combine command (Ctrl+L) to rejoin the parts.
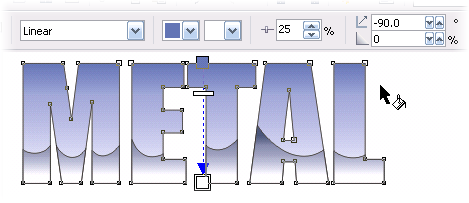
With your combined shapes still selected, choose the Interactive Fill Tool. Using Property Bar options, choose Linear as the Fill Type, enter -90 in the Angle box and 14 in the Edge Pad box. Choose Navy Blue (C=60, M=40, Y=0, K=40) as the From color, White as the To color, and enter 25 as the Mid-Point value (see below).
Step 4: Apply the Color and Contour Effect
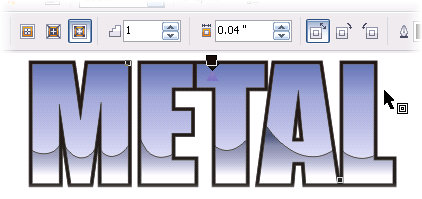
Paste (Ctrl+V) a copy of your text back into the arrangement from your earlier object copy operation back in Step 2. With the copy still selected, send it to the back layer (Shift+PageDn) and choose the Interactive Fill Tool again. Choose Linear Fill Type, enter -90 in the Angle box, choose Baby Blue (C=60, M=40, Y=0, K=0) as the From color, White as the To color, and enter 25 as the Mid-Point value (see below).
Using the Pick tool, select the new text copy with the fountain fill applied and choose the Interactive Contour Tool. Using Property Bar options, choose Outside as the contour style, enter 0.04 inch in the Offset box and enter 1 in the Steps box (see below).
At this point, don’t be too concerned about the color of the contour object – you’ll be changing it shortly. Using the Pick tool, right-click the contour object and choose Break Contour Group Apart (Ctrl+K) from the popup menu. Click a blank space on your page to deselect all objects, click on the contour object again, and press Ctrl+K to break apart the contour objects. With the objects still selected, open the Fountain Fill dialog (F11). Using this dialog will enable you to apply a fountain fill to all the selected objects at once.
Choose Radial as the fountain fill style, click the Custom button, and enter the following custom fountain fill color scheme: Position 0=Navy Blue (C=60, M=40, Y=0, K=40); position 50=White, and; position 100=Baby Blue (C=60, M=40, Y=0, K=40). Click OK to apply the fill.
Step 5: Make Character Repairs using the Combine Command
One of the characters contains a ‘negative’ space and needs minor repair work-namely the uppercase A (see below). For recombine the shapes, select both objects and use the Pick Tool and the Combine (Ctrl+L) command.
Before proceeding to the next step, select all the contour shapes and group them together (Ctrl+G) and remove the black outlines from all the objects in your drawing (see below). At this point your effect is virtually complete except for some detailing.
Step 6: Create a Transparent Star Highlight
Since chrome and other types of metal reflect light, you may wish to include highlights. If you’d like to add star highlights to the effect, try these next steps. Create a star-shaped object by choosing the Polygon Tool (Y). Hold Ctrl+Shift and click-drag to create a new star polygon at default settings. Increase the Number of Points on the shape to 8 using Property Bar options (see below). Use the Shape Tool to edit the shape. Before proceeding, fill your star object with White and set its outline color to Black.
Choose the Interactive Transparency tool and click-drag from the center of the star to the end of any one of its points. Using Property Bar options apply these properties: Transparency Type=Radial, From color=Black, To color=White, Edge Pad=0, Mid-point=80 (see below). Using the Pick tool, resize your star to roughly 0.5 inches in diameter. For a more detailed explanation on creating these objects, check out my lighting details tutorial.
Step 7: Add Star Highlights to Key Locations
Position the star over any of the brightest points you see on your first character. Then, copy the star (using the right mouse button to click as you drag the original) to the brightest points on all of the characters in your word. For the finishing touch, use the Pick tool to select the contour object. Apply a shadow using the Interactive Drop Shadow Tool as I’ve done (see below).
Adding the star highlights and drop shadow to your text effect may not be necessary (or even desirable) in certain instances, but the steps to do so are nonetheless available for you to follow. Your chrome effect may also be adjusted for color, and effect, but the bevel size should remain thin and subtle since the bevels themselves lack corner edges.
 If you found this tutorial useful, make a donation. Your show of support will help fund future tutorials and steer the direction of new site content.
Steve Bain is an award-winning illustrator, graphic designer, and author of nearly a dozen books on illustration and design including CorelDRAW The Official Guide.











Having just completed another tutorial on a similar subject, I find yours to be much clearer and easier to follow.
Thank You
That’s great to hear! Thanks Ron.
Awesoe man! easy steps and cool effect! thanks
Cool tutorial. Thanks!
Thanks for the great info.
It’s exactly what I was looking for.
I love this blog~!
OMG THIS IS SOME LOVELY STUFF. PLEASE CONTINUE, After reading tis let me tell you, about 25 of my friends will be visiting this blog regularly. I have only seen this 1 tutorial and i am seriously EXCITED!!! And Please Keep up the GREAT work 🙂 🙂 🙂
Your jobs are so magnificent. Thanks a lot !