By Steve Bain
 With all the various ways you can work with digital images in CorelDRAW, you’re eventually going to need (or want) to do a little cropping. Image cropping involves temporarily hiding – or even deleting – portions of a digital image. It’s generally done to change the image proportions to fit a specific design need and/or delete unneeded pixels and reduce your file size. You can do it easily with any version of CorelDRAW and it’s a relatively straightforward operation.
In this tutorial, I’m using an older version of CorelDRAW to demonstrate. But you can use these same techniques with virtually any version. Before we get started though, let me clarify one potential confusion point. If you’re using a recent CorelDRAW version, you might understandably reach for the Crop Tool.
 The Crop Tool provides an automated way of cropping objects — including digital images. When it was first introduced (version 13) applying it to an object essentially deleted all content outside the cropping area you specified. Although this meant it was a great tool for cropping individual objects, it prevented you from cropping objects already inserted or embedded into an existing arrangement or montage. If you’re using version 15 and beyond, you’ll discover this behavior has been fixed. Just wanted to get that off my chest.
 The technique I’ll cover in this tutorial is the manual method that will enable you to crop at the vector level by manipulating the invisible path surrounding the digital image using the Shape Tool (F10). The Shape Tool method is more involved and perhaps less convenient than the Crop Tool, but it provides more control and gives you the added bonus of being able to custom craft the bitmap boundaries to an unconventional shape if needed.
Unlike bitmap-editing applications, a digital image in CorelDRAW is essentially a bitmap-based object housed inside an invisible container called a as clipping path. This means the clipping path contains the image and its boundaries determine the bitmap’s overall shape. Although these containers are inherently invisible, they are an integral characteristic of each bitmap in your document. Control the shape of the container and you control the cropping of the bitmap it contains.
To shape a bitmap container, you’ll need to use the Shape Tool to change the position of the path nodes comprising it. Let’s walk through at a typical rectangular-shaped cropping operation by following these brief steps.
- To begin, you’ll need to have a bitmap at the ready. Bitmaps may be converted from vector objects using the Convert to Bitmap command, or brought in from an external source using the Import command (Ctrl+I). Once on your page, simply click to select the bitmap itself.
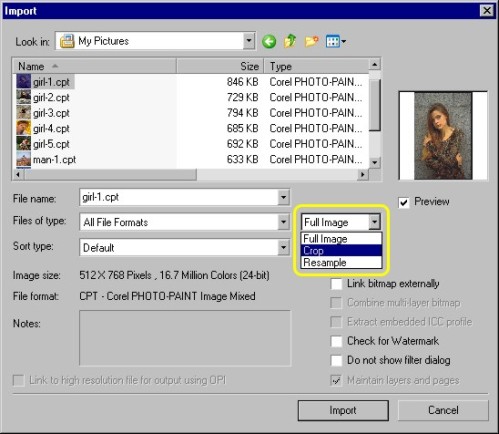
- If you choose to Import your bitmap, you can crop it before it reaches your page by choosing Crop from a drop-down menu in the Import dialog (shown next).

- After choosing Crop and clicking OK, the Crop Image dialog (shown next) will open enabling you to either use the Hand-style cursor to interactively set the rectangular cropping, or by entering values in the Top, Left, Width, and Height boxes followed by clicking OK. Doing this will enable you to place a permanently cropped copy of your selected bitmap onto your page.

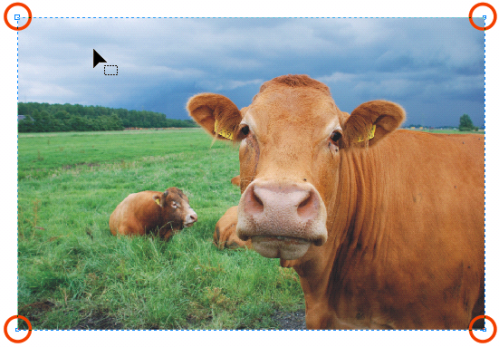
- If the image you wish to crop already exists in your document, and you wish to crop it, choose the Shape Tool (F10) and click to select the bitmap. Notice four nodes appear at the corners of the image (shown next). Dragging these points will cause the bitmap’s clipping path shape to change, enabling you to hide portions of the bitmap from view withoutdeleting the pixels.

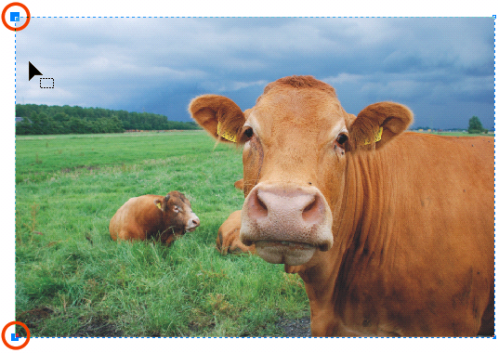
- Using the Shape Tool cursor, click one of these nodes and drag it toward the center origin of the image. Notice that after you release the mouse, a portion of the image is hidden (as shown next).

- Drag the same corner node back to roughly its original position and notice that the hidden portion of the image is visible again. You have just performed the most basic of cropping operations.
Most digital images are usually cropped either vertically or horizontally to fit a square or rectangular space. This requires moving the corner nodes while maintaining their alignment.
To perform a side, top, or bottom cropping operation on a bitmap, you’ll need to have at least two corner nodes selected at one time, and they must be moved either using nudge keys or by dragging. The dragging operation is a little trickier than you might think, since it involves selecting and moving two corner nodes while holding a modifier key to constrain the drag movement.
To crop a bitmap by dragging, follow these steps:
- Using the Shape Tool, click to select the bitmap. Determine which side you wish to crop, and select both corner nodes on the side by holding Shift while clicking once on each node, or click-drag to select them with the marquee.

- Once the nodes are selected, hold Ctrl as the modifier key while dragging both nodes toward the center of your bitmap. Holding Ctrl constrains your dragging movement, which keeps the sides in vertical and horizontal alignment.

- Continue cropping any of the sides using this same procedure until the cropping operation is complete. The example shown next illustrates typical results of cropping.

- As a final optional step, you can eliminate the hidden portion of the image using the Crop Bitmap command either by choosing Bitmaps > Crop Bitmap or by clicking the Crop Bitmap button (shown next) in the Property Bar using the Pick Tool and while a cropped bitmap is selected. Doing this will permanently remove the image portions which are hidden from view enabling you to reduce your document file size.

Keep in mind that you can also use this cropping technique to create non-rectangular cropping shapes by adding nodes to the bitmap container and manipulating the curve properties as shown below.
The next two examples illustrate the benefits of careful photo cropping. In these examples, a photo montage has been laid out without cropping and then improved through careful cropping and re-arrangement.
For more information on the design and aesthetic aspects of cropping images in different ways, see my tutorial on improving image impact.
 If you found this tutorial useful, make a donation. Your show of support will help fund future tutorials and steer the direction of new site content.
Steve Bain is an award-winning illustrator and designer, and author of nearly a dozen books including CorelDRAW The Official Guide.


I have a ‘resample/save’ problem in PhotoPaint X4. The image comes in as jpg at ‘say’ 22″/72dpi I ‘resample’ at 6″/300dpi then save or save-as. When I re-open the image it is back at the original (22″/72dpi).
John, I’m guessing that your image includes EXIF data and that the JPG format is preserving the X and Y resolution (choose File > Document Info and explore the EXIF tab to confirm this). The JPG format saves EXIF camera data. Try performing the identical resample operation and saving in TIF format instead (the TIF format doesn’t preserve EXIF). Be sure to close the document file and reopen it.
Steve, Thanks. It did contain the EXIF info. I resampled and saved as TIF, changes saved OK. I can do that in future – but what has changed? I used to resample and save thes files as jpg. Maybe the Canon EOS Software?
My best guess is that it’s likely a characteristic of how the file format (JPEG) interprets and preserves the inherent EXIF and PhotoPaint’s specific ability to alter that data.
thanks! I can now crop in x4. I wish I could add a circle or ellipse to use as a cropping tool though.
It may be easier to PowerClip your photo into the ellipse/circle. Right-drag (drag using the right mouse button) your photo, release within the ellipse boundaries, and choose PowerClip Inside from the popup menu. 😉
oh wow, SLICK! 🙂 :notworthy:
Thanks Steve!
thanks for this tutorial. i’m just use corel draw for 1 month and was assign to design annual report for organization
Best and easiest info. out there!
hi 🙂
I’m just confuse in the part at the final step
when you say you must choose the ‘crop bitmap’ from ‘Bitmaps’
I already click it, but there’s no property box shown.. can u help me?
Thx 🙂
Anyway I use the CorelDRAW X3
Hi Arleen,
Using the command menus, choose Bitmaps > Crop Bitmap.
Cheers! Steve
Hi
I would like to cut out an image using Corel Draw 9, but am not sure how to cut the parts inbetween. e.g. if you have a cupboard with open spaces, how do you cut out the open spaces in a way that you end up with just the frame work and still use a background pattern on page? So when you place your object on the background, the open spaces won’t block it and remain solid?
Not sure if I’m clear enough…I tried converting to bitmap and then managed to cut out the areas I don’t want, but when I saved it, and returned to “normal” page the “holes” I created became solid white pieces, so I can’t use it with my background pattern.
Any advise will be appreciated. Thanks
Hi Bianca, I’m guessing you are trying to place an unbroken pattern into two objects. There are multiple ways to tackle this. Perhaps the easiest though is to select your two ‘frame’ objects and combine them (CTRL+L) into a single curve. Then select your pattern object and choose Effects > PowerClip > Place Inside Container and use the targetting cursor to target your combined objects. Cheers, – Steve.
Hi Steve! Thx for the tips that you give me, it really helps alot x)
But this time, I want to ask again..
you say that we can do the non – rectangular cropping.
Can you tell me how to do that? Also how to add nodes..
Thx Steve! 😀
Arleen, try using the Shape Tool to edit the shape of your bitmap container (meaning the outer edge of the bitmap). Double-click to add a node, or double-click on a node to delete it. You can also add nodes by clicking the path once and pressing the + key on your numeric keypad. Apply curved shaping using options in the Property Bar while working with the Shape Tool.
wow! thx Steve x)
It really helps me alot! Now I can do my school project xD
I am trying to crop pictures of items for sale. I can get it pretty close, but how do you get it so it looks exactly like the item is floating by itself? I always have areas of the bitmap remaining, or crop off bits of the item.
Excellent question Sue. It sounds to me like you are trying to perform a close-crop rather than a simple crop (there’s a slight difference). Close-cropping is best done using PhotoPaint and imported or from within CorelDRAW using the Edit Bitmap command while the bitmap is selected.
I recommend reading the following tutorials to give you alternate strategies to achieve that effect:
Regards, Steve
your tip have i long way to help complete my project.
i think it nice to have people like you with things like that.
I am a new comer for corel draw X5. How can I crop image in circle shape.
Try this:
1. Create an Ellipse with the Ellipse Tool (Hold Ctrl to constrain to a perfect circle).
2. Select the your image using the Pick Tool and choose Effects > Powerclip > Place Inside Container.
3. Click on the image using the targeting cursor that appears.
4. To reposition the bitmap inside the container, choose Effects > Powerclip > Edit Contents (or Ctrl-click the ellipse).
Thanks so much. I’ll try it when on my pc. Pls i need some photographs which can be use for graphic design like landscapes, themes, advance clipart. U can send them to my email. God bless u.
I am trying to upload a stencil from coreldraw to command n cut which is a program used on cnc plasma cutter. The problem is that when i go to open file on command and cut after saving it to a plt. file it is saying;Resolution of object set too high. Resolution fault at : 0 units. So i went back to coreldraw and tried it with resolution all the way down, saved it, tried to open it in command n cut and same thing. Any ideas?
thanks master steve you really helped me
i wnt to take a bitmap image and put it into a shape for example like a curvy highway ie like using the envelope on text can this be done?
Use the PowerClip effect. Click-hold on the bitmap using your right mouse button, drag the bitmap over the highway object, and release the mouse button to view a popup menu. Choose PowerClip Inside. The bitmap will be placed inside the highway object. Ctrl-click to enter and exit the editing state to position or resize the bitmap.